Facebook Pixel is a tool within Facebook for Business. It can track conversions (actions) on your website as a result of your Facebook Ads, retarget specific audiences, and give you valuable insight into how your users are interacting with your content.
This feature has been around for a while but recently experienced a major update. In this guide, we’ll talk about what the Facebook pixel actually does, show you the three most important features of the updated version, and take you through how to use it for your business.
What is the Facebook pixel?
A pixel is actually a small piece of code created by Facebook that you can then install on web pages.
The previous version of Facebook Pixel included two separate components. The first was the Website Custom Audience Pixel, which tracked and recorded Facebook users that interacted with your site. With this you could see people that went from your Facebook Ads to your website and then target those people as a custom audience for future Ads. The second component was the Conversion Tracking Pixel which would tell you what actions (or conversions) users completed on your website.
Conversions are the reason we pay for Ads on Facebook, right? That’s why this information is so valuable. With pixels we can see just how effective our Ads are, and how to make them better. But there were several flaws in the old version of this tool. Thankfully, with the update to Facebook Pixel, we can use pixels more efficiently and be even more specific in our conversion tracking.
You can read the full announcement, but below are the three most important updates to the new version of Facebook Pixel:
Important Improvements
1. One Pixel is Better Than Two
The previous version included the two separate pixels discussed above – one for tracking audience and the other for tracking conversions. Both pixels needed to be installed separately on the desired website pages. Because of this, websites often had many different pixels on the same page.
The update includes a consolidated pixel for tracking both necessary components. Having only one pixel makes everything simpler in terms of installation, and also with data. With each installed pixel (in the old version), Facebook would have to send information for that pixel alone. Now, the process of sending data has been streamlined.
2. Pixel Speed
In their release, Facebook announced that the new pixels were “now up to 3X faster” than the old ones. As we all know, site speed affects SEO – so this was a significant improvement. The presence of multiple pixels on a single web page was a drag on overall site speed. Sending information for each and every pixel was a complicated process that slowed things down as well.
I mentioned that a pixel is code – but for what? When you install a pixel on a website page’s code, you’re actually placing an invisible 1×1 pixel image. These images are what send information to Facebook when a user completes an action on the page. With multiple codes installed the site was downloading multiple images. Fewer pixels mean fewer images, and this means faster site speed.
3. More Tracking Options
The original version of the pixel allowed you to track one of five different actions. These actions were:
- Checkout
- Registration
- Lead
- Key Page View
- Add to Cart
You had to choose one (and only one) before Facebook would supply you with the pixel code. If you wanted to track more than one of these actions on the same page, you could install more individual pixels (one per extra action). This, of course, was another huge drag on site speed, not to mention the fact that all of these different pixels became complicated for you to keep track of.
The updated pixels now give you an amazing array of options through an expanded list of actions and an added parameter list. The actions now include:
- View Content
- Search
- Add to Cart
- Add to Wishlist
- Start Checkout Process
- Add Payment Information
- Complete Purchase
- Lead
- Complete Registration
In addition to this expanded list, you can also now customize parameters for the actions above. I’ll show you exactly how to do this in the next section. The available parameters are:
- Value
- Currency
- Content Name
- Content Category
- Content ID
- Content Type
- Number of Items
- Search String
- Status
If you’re not sure which actions or parameters you should be tracking, Facebook gives us a more in-depth look at each of the options. The parameters are shown in their chart below:
Now that you understand the fundamental updates to the new version of this tool, we’ll get into how exactly to set pixels up on your website and what to do with them once they’re there!
How You Can Use Pixels
Whether you already have the old pixels installed or have never even heard of the feature before, this section will take you through how to set up the new version.
Note: If you already have them installed, you will need to update to the new pixels. Facebook plans to retire the old version in the later part of 2016.
- You’ll find the Pixel tool within Facebook’s Power Editor platform. Once you’re on the Power Editor dashboard, click on the “Pixels” option under the Tools drop-down menu bar. I would recommend opening Pixels in a new tab – you’re going to need to come back to the Power Editor page later.
- Next, you’ll see a page with an option to Create a Pixel. Click this and name the pixel after your business. You can choose to email the code to yourself or someone else (if you have a site developer), but we’re going to go ahead and install the pixel now.
- Another window with code at the top will appear. This is called the base code for the pixel, and it needs to be installed on each and every page of your website. For help on this, click here. The image below is a screenshot of the window, but not all of the code can be seen without scrolling down. Use this code when copying and pasting for your own site, but for now look at the image beneath where you can see the pixel in its entirety (with the exception of your Pixel ID, which you will have to input yourself – keep reading!).
- Click “Next” and then “Done.” This will take you to your Facebook Pixel dashboard. There’s no data or information because we still need to install the pixel code with your unique ID. Let’s look back at the step above about creating the base code.
- Notice that
is highlighted two times within this code. This is where you’ll have to manually input your account’s Pixel ID, which can be found by: - Selecting the “Audiences” option from the tabs in Power Editor.
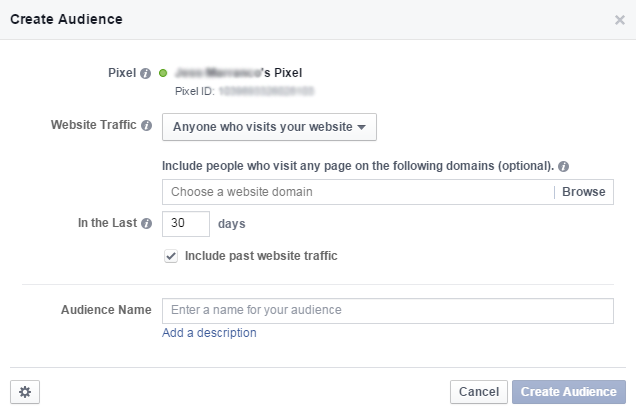
- Choose an existing audience or create a custom one. A pop-up window will ask you for details on your new audience. Look at the second line of text, right under where it says, “YOUR NAME’s Pixel.” The ID will be shown there.
- Place the finished code with your Pixel ID on each web page, between and . If there is other code there, make sure the pixel is placed just above .
- To make sure it’s working properly, go to any page the pixel was placed on and check back at your Pixel dashboard. If everything is working, there should be some activity shown for that page. You should also see that the pixel’s status is active. If you’re having problems, try troubleshooting in Facebook’s Help Center’s area on pixels.
- Once you have the base code with your Pixel ID installed on all web pages, you officially have enough pixel code to track audience. To track conversions, you’ll need to decide which actions you want to focus on. Keep in mind that you can choose more than one. You must have the base code installed before you can add anything for conversions.
- For each action or conversion, a little bit of extra code needs to be inserted into the base code. While the base code appears on every page, the conversion code is only installed on pages where that action occurs.
- Think carefully about which conversions mean the most to your website and where those conversions happen. For example, if you want to track leads you can install pixels on landing pages for free content (like ebooks) you’ve created.
- The code needs to be in the following format:
- The code above is an example of a structure including one event and two parameters. But you can customize it and add more events (conversions) and parameters based on your needs.
- The formats for tracking the nine possible events/actions/conversions are shown below:
- For parameters, use the chart below – shown earlier in the Important Improvements section. The parameters allow you to narrow down your tracking efforts even further.
- All of this conversion code should go in the center of the base code, above .

PARAMETER_ 1:’PARAMETER_VALUE’,
PARAMETER_2:’PARAMETER_VALUE’});
Some Examples
If I want to track when people View Content (with a specific product as my parameter), this is what my code could look like:
content_type: ‘product’,
content_name: ‘Hoodie’,
value: 20.00,
currency: ‘USD’
});
These are example parameters – you can include or leave out as many as you want to. To include more than one event, simply list them one after another. The following code will track leads as well as complete registrations, or people who filled out a form to download an ebook. This would be useful information when using Facebook Ads to promote free industry content you’ve pushed out.
fbq(‘track’, ‘CompleteRegistration’ {
content_category: ‘ebook’
});
Applications
With all of this technicality, you might be wondering whether the effort is worth it.
The customization of events and parameters is limitless, and so are the applications of the data. Sure, other analytics tools can get you pretty great data on how your Facebook Ads perform, but pixels are unique in that they show you incredibly specific conversions that other platforms cannot track. And if the parameters seem a little too involved and in-depth at this time, you can simply track for the conversions on their own.
Once your pixels are in place, it’s time to attach them to actual Facebook Ads. Doing this will optimize the Ad for the action you want taken (purchasing, for example) – and send it out to even more people who are likely to take that action as well.
Creating new Facebook Ads and attaching them to your pixels to track conversions is easy. Visit the Ads Manager page and select the “Increase conversions on your website” option.
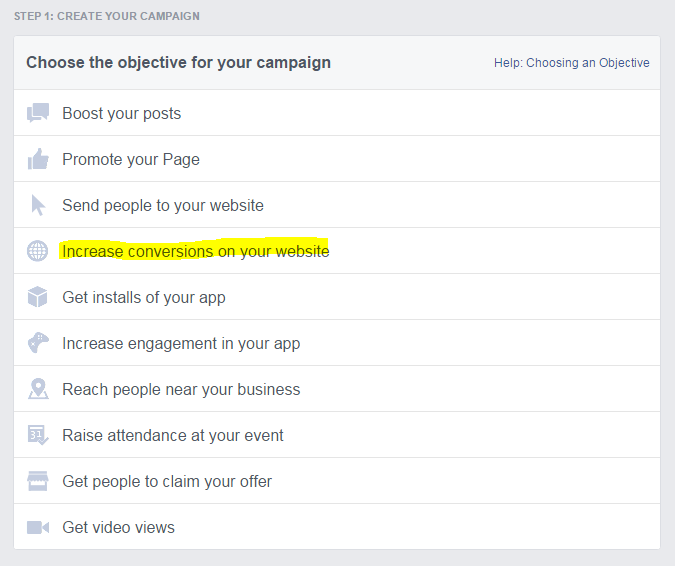
Enter your website’s URL and a conversion event box should appear. When you click on it, you’ll be able to select one of your pixels. You’ll still be tracking multiple events per the code you’ve already installed, but you have to choose one conversion to optimize. Keep in mind, if you’re optimizing for a product, the URL you enter should be the product page. If you’re optimizing for leads, you should include a page with a form to get in contact with you.
You can also add pixels within Power Editor and when boosting a Facebook post. Just keep your eyes peeled for any options to add Conversion Pixels – they’re always pretty obvious, but Facebook does change placement pretty often.
We’ve been talking a lot about conversions, but let’s also not forget that the pixel you added also tracks your audience. Audience is one of the most important factors of any marketing effort, and Facebook Pixel offers an amazing option when it comes to yours. From the Facebook Pixel dashboard, click on “Create Audience.”

Once your pixel is installed, you might see that groups of people are displaying trends in behavior. One issue many ecommerce sites see is people starting the checkout process but not completing it. You can retarget these specific people using Pixel with a new Ad – maybe free shipping or a special discount will convince them to make a purchase.
Click on the Website Traffic drop-down and select the option for people visiting specific web pages. Enter the URL of your checkout page. You can also add other conditions by selecting the Custom Combination option.

Takeaways
After all the hard work of setting up your pixels is complete, it really is simple to use and reuse them in your future Ads. And as long as your pixels are set up on the right pages, you’ll be able to track traffic, conversions and audience that result from your Ads and boosted posts.
When you find that one of your Ads is successful and resulted in conversions, optimizing for that action in future Ads using the steps described in the previous section will help Facebook target other people who are especially likely to make the same conversion. You’ll also be able to quickly stop and make changes to Ads that are not as successful, saving valuable time and money in the process.
Pixels are like long and winding roads that eventually take you somewhere you really, really want to go. Use this guide as well as the plethora of educational content in the Facebook for Business Help Center to get your business and its Facebook Ads where you want them to be.
About the Author: Lauren is an Inbound Marketing Specialist at Mainstreethost, a digital marketing agency based in Buffalo, NY. She frequently writes about topics in social media marketing, as well as many other aspects of digital marketing. Connect with Lauren on Twitter.
No comments:
Post a Comment